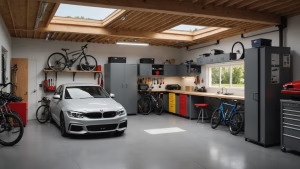
Is your garage a chaotic cavern of forgotten tools, overflowing boxes, and bikes perpetually tripping you up? You’re not alone! For many of us, the garage becomes a catch-all for everything that doesn’t quite fit inside the house. But what if your garage could be more than just a dumping ground? What if it could be a highly organized, efficient, and even beautiful extension of your home?
Imagine walking into a garage where every item has its place. No more tripping over lawnmowers, searching endlessly for a screwdriver, or playing Jenga with holiday decorations. This isn’t just a pipe dream; it’s a realistic goal with some smart strategies and clever hacks.
This article is your ultimate guide to transforming your garage from cluttered chaos to organized bliss. We’re diving deep into 10 genius garage storage hacks that are not only effective but also Pinterest-worthy. We’ll show you how to maximize every inch of space, from floor to ceiling, and keep your belongings easily accessible. Get ready to reclaim your garage and enjoy the peace of mind that comes with a perfectly organized space!
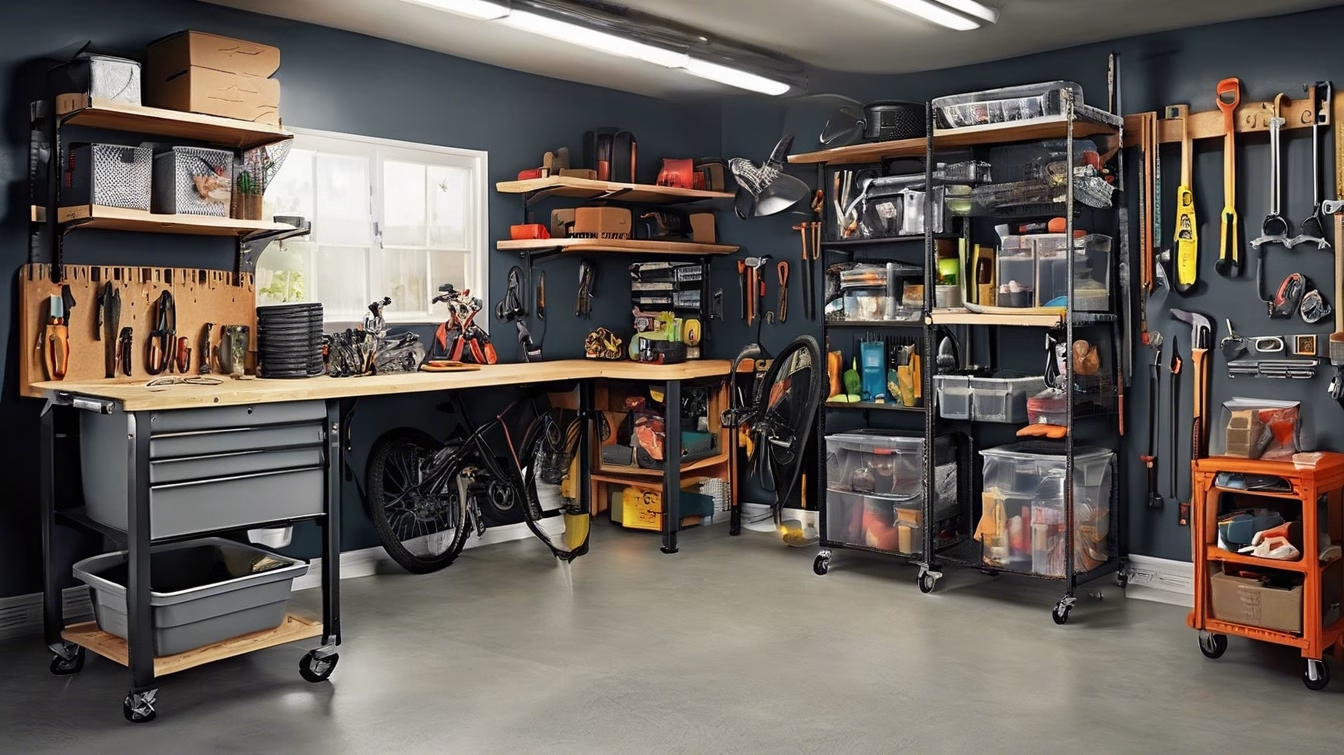
1. The Wall-Mounted Marvel: Vertical Storage Solutions

When you’re short on floor space, the only way to go is up! Your garage walls are prime real estate just waiting to be utilized. Wall-mounted storage solutions are a game-changer, as they get items off the floor and into easily accessible, designated spots.
Unlock Your Walls: Beyond the Basic Hook
Forget about just a few lonely hooks. Think of your garage walls as a blank canvas for organization. The key here is systematic vertical storage.
- Slatwall Systems: If you’re serious about customization and flexibility, a slatwall system is your best friend. These panels install directly onto your studs and feature horizontal grooves that accept a variety of hooks, baskets, and shelves. You can easily reconfigure your layout as your needs change, making it perfect for tools, sports equipment, garden supplies, and more. Imagine having all your rakes, shovels, and trimmers neatly hung and visible, rather than propped haphazardly in a corner.
- Pegboard Power: A classic for a reason! Pegboard is incredibly versatile and budget-friendly. Install large sheets of pegboard to create a dedicated tool wall. Use different types of pegs, hooks, and small bins to hang everything from wrenches and hammers to screwdrivers and paintbrushes. The beauty of pegboard is its instant visual organization – you can see exactly where every tool belongs. Plus, you can outline tools with a marker for a truly professional look, ensuring everything is returned to its rightful spot.
- Track Systems (Rail Systems): Similar to slatwall but often with a single rail, these systems allow you to hang a variety of accessories. They’re excellent for heavy-duty items like bikes, ladders, and large garden tools. The robust hooks can handle significant weight, ensuring your valuable equipment is securely stored and off the ground. These are particularly popular for sports enthusiasts who want to keep their gear organized and easily accessible.
- Heavy-Duty Shelving: Don’t underestimate the power of simple, sturdy wall-mounted shelving. Whether it’s wire shelving for lighter items like cleaning supplies and car care products, or robust wood or metal shelving for paint cans and automotive fluids, getting these items off the floor frees up valuable square footage. Consider adjustable shelving for maximum flexibility.
- Hanging Bins & Baskets: For smaller items that would otherwise clutter shelves or workbenches, wall-mounted bins and baskets are fantastic. Think about screws, nails, paint accessories, or even small gardening tools. Clear bins are a bonus, allowing you to quickly identify contents.
- Bike Storage Solutions: Bikes often take up an incredible amount of floor space. Vertical bike hooks or pulley systems are brilliant for getting bikes up and out of the way. You can hang them horizontally against the wall or even vertically from the ceiling. This simple hack can free up several square feet of precious floor space.
- Folding Workbenches/Tables: If you occasionally need a workbench but don’t have space for a permanent one, consider a wall-mounted folding workbench. These ingenious designs fold flat against the wall when not in use, instantly reclaiming your floor space.
- Specialized Holders: Don’t forget specific items! There are wall mounts for extension cords, garden hoses, brooms, mops, and even specific power tools. Utilizing these dedicated holders prevents tangles and keeps things neat.
- DIY Plywood Wall Systems: For the handy DIYer, a custom plywood wall system with cleats can be incredibly effective and tailored to your exact needs. This allows for heavy-duty storage and a completely custom layout.
- Recessed Wall Cabinets: If your garage walls are thick enough (or you’re doing a renovation), recessed wall cabinets can offer discreet, dust-free storage without protruding into the space.
- Magnetic Tool Holders: Install magnetic strips on your wall or workbench to instantly grab and store metal tools like screwdrivers, wrenches, and pliers. This keeps frequently used tools right at your fingertips.
- Recycled Container Storage: Repurpose old plastic bottles or containers by cutting them and attaching them to a pegboard for storing small hardware.
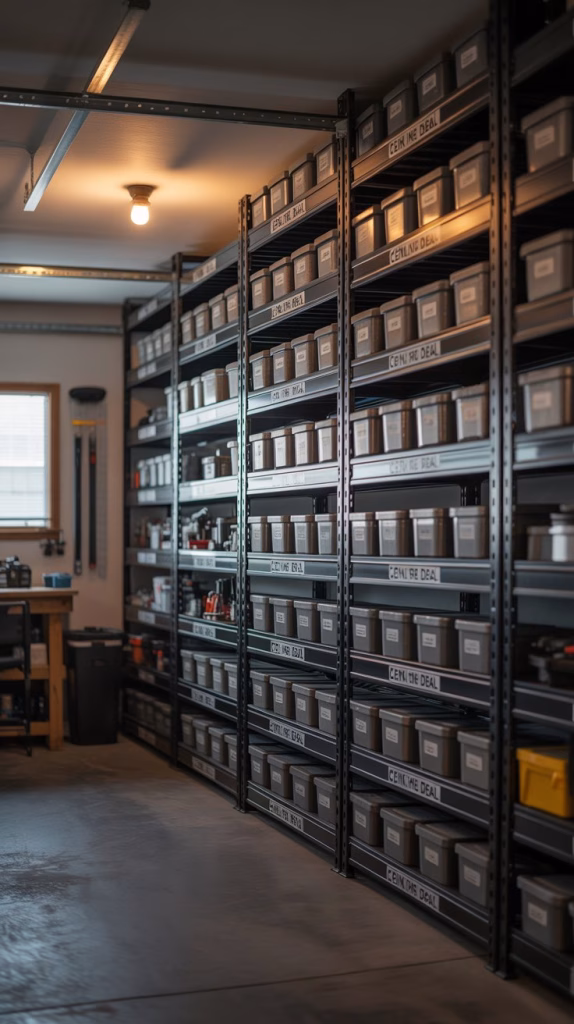
2. Ceiling the Deal: Overhead Storage Secrets
Your garage ceiling is often the most overlooked storage area, yet it offers immense potential, especially for long-term or seasonal storage. Imagine freeing up valuable floor and wall space by getting bulky, infrequently used items up and out of the way.
Unlocking the Upper Limits: Capitalizing on Ceiling Space
When considering overhead storage, safety and stability are paramount. Ensure whatever system you install is properly anchored into ceiling joists.
- Overhead Racks/Shelves: These heavy-duty steel racks attach directly to your ceiling joists, creating a strong, stable platform for storage. They come in various sizes and can hold hundreds of pounds. This is ideal for holiday decorations, camping gear, seasonal clothing, luggage, and large storage bins. Think about the items you only need a few times a year – these are perfect candidates for overhead storage.
- Motorized Lifts: For heavier items like kayaks, canoes, or even car top carriers, a motorized hoist system is a fantastic investment. With the push of a button, you can raise or lower your items, making storage and retrieval effortless. This prevents heavy lifting and potential injury.
- Pulley Systems: Similar to motorized lifts but manually operated, pulley systems are great for bikes, ladders, or even large sports equipment. They use ropes and pulleys to hoist items up to the ceiling, keeping them out of the way. These are often more budget-friendly than motorized options.
- Ceiling-Mounted Bike Hoists: Specifically designed for bicycles, these hoists securely lift bikes off the floor, freeing up significant space. They are particularly useful if you have multiple bikes.
- DIY Plywood Platforms: For the confident DIYer, a sturdy plywood platform built into your ceiling joists can create custom storage. Just ensure it’s securely fastened and rated for the weight you intend to store.
- Fishing Rod Racks: Long, unwieldy fishing rods can be neatly stored parallel to the ceiling using specialized clips or DIY solutions like PVC pipe sections.
- Lumber Storage: If you work with wood, long pieces of lumber can be stored neatly along the ceiling using heavy-duty brackets or custom-built racks. This keeps them straight and off the floor.
- Ladder Hangers: Ladders are another item that takes up a lot of floor space. Ceiling-mounted ladder hangers get them completely out of the way, making your garage safer and more navigable.
- Bin Storage with Lids: Use large, clear plastic bins with lids for overhead storage. Label them clearly so you know exactly what’s inside without having to pull everything down.
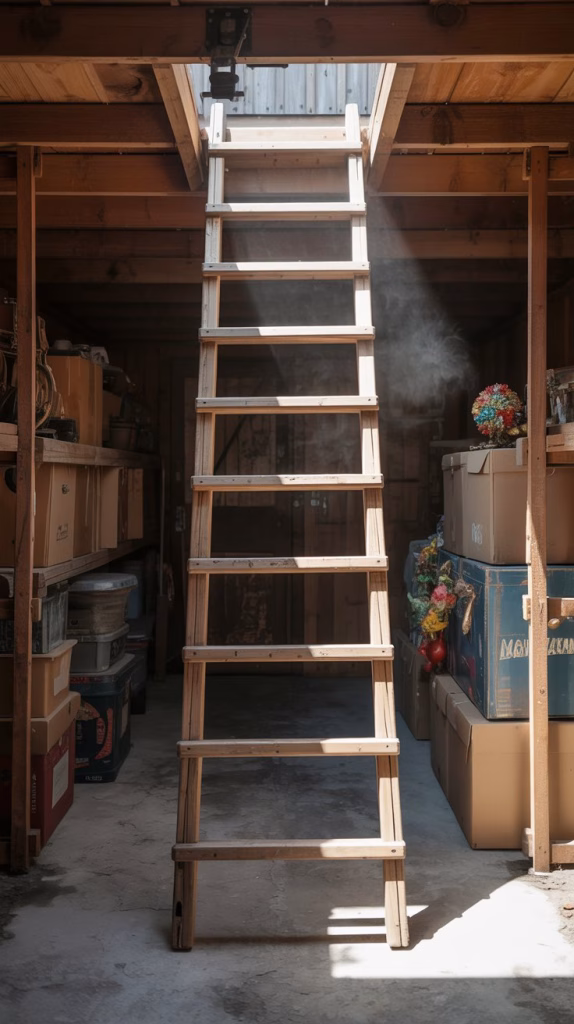
- Attic-Style Garage Storage: If your garage has an accessible attic space above, consider adding a pull-down ladder to utilize this often-forgotten area for long-term storage.
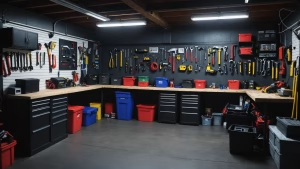
3. Pegboard Power: Unleash Your Tool Organization
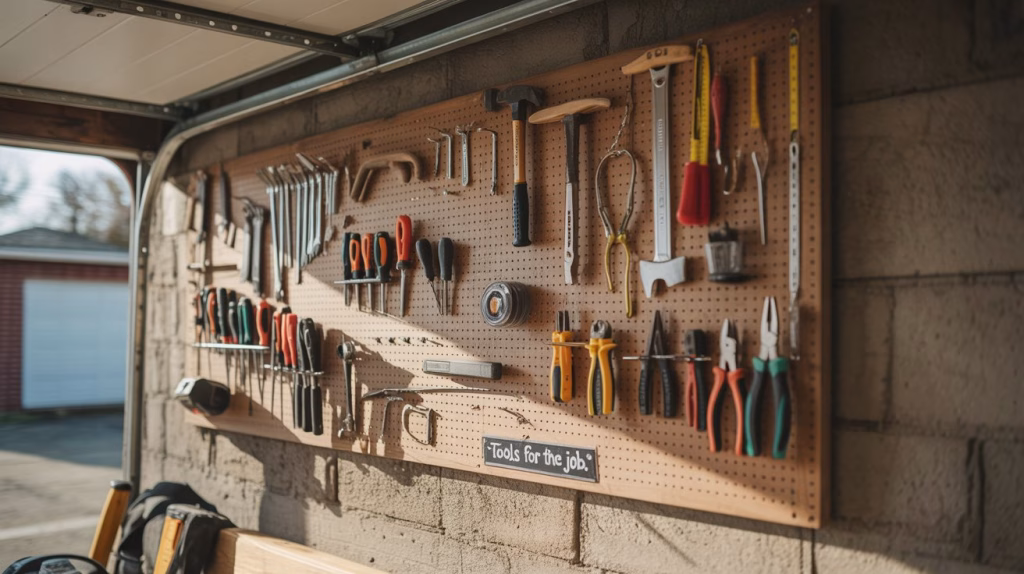
Pegboard isn’t just a classic for nostalgic reasons; it’s an incredibly practical and adaptable solution for tool organization. Its simplicity belies its power to transform a messy workbench or wall into a highly efficient and visually appealing tool center.
The Ultimate Tool Wall: Maximizing Pegboard Potential
The key to maximizing pegboard isn’t just hanging things; it’s about creating a systematic, intuitive layout that makes finding and returning tools effortless.
- Outline Your Tools: For true pro-level organization, trace the outline of each tool directly onto the pegboard. This creates a “shadow board” effect, making it instantly obvious when a tool is missing and guiding you (and anyone else using your tools) exactly where to put it back. This also encourages better habits.
- Varying Hook Types: Don’t limit yourself to basic hooks. Explore the wide variety of pegboard accessories:
- Single hooks: For individual tools like wrenches, screwdrivers, and pliers.
- Double hooks: For heavier tools or those that need more stability.
- Loop hooks: Perfect for hammers, drills, and other tools with handles.
- Bins/Cups: Small plastic or metal bins attach to the pegboard to hold nails, screws, drill bits, pencils, and other small components. Clear bins are ideal for visibility.
- Shelves: Small pegboard shelves are great for holding spray cans, glues, small containers, or even a small radio.
- Paper towel holders: Keep paper towels handy for quick cleanups.
- J-hooks and L-hooks: For hoses, extension cords, or other items that can be coiled.
- Group Like Items: Organize your tools logically. Keep all screwdrivers together, all pliers together, and all measuring tools in one area. This creates an intuitive flow and saves time.
- Utilize Vertical Space: Hang longer items like levels, saws, and large clamps vertically to maximize the height of your pegboard.
- Designated Zones: Consider creating zones on your pegboard: a drilling zone with drills and bits, a measuring zone with tape measures and levels, a cutting zone with saws and utility knives.
- Add a Small Workbench: If you have space, position your pegboard directly above a small workbench. This creates a cohesive and highly functional workspace where your tools are always within arm’s reach.
- Lighting Integration: Consider adding a small LED strip light above your pegboard to illuminate your tools, especially if your garage lighting isn’t ideal.
- Color-Coding: For extra flair and organization, you could even color-code the outlines of your tools or use different colored bins for different types of hardware.
- Beyond Tools: Don’t just limit pegboard to tools! It’s fantastic for craft supplies, gardening tools, cleaning supplies (hang brooms and dustpans!), or even sports equipment.
- Easy Access, Easy Return: The goal of pegboard is to make it so easy to grab a tool that there’s no excuse not to put it back. When everything has a clear home, your garage stays tidy.
4. Repurposed Racks: Clever Ways to Store It All
The beauty of organization often lies in seeing new potential in old items. Repurposing racks and units designed for other purposes can unlock incredibly creative and cost-effective garage storage solutions. It’s about thinking outside the box and giving items a second life.
From Old to Organized: Repurposing for Garage Greatness
Before you toss that old piece of furniture or shelving, consider how it could be transformed into a garage organizational powerhouse.
- Old Dresser/Chest of Drawers: A dresser that’s seen better days can become a fantastic storage unit for your garage. Remove the drawers for open shelving, or keep them to store paint cans, automotive fluids, or even smaller power tools. The top surface can serve as an extra workbench or staging area. If the drawers are deep, they are perfect for larger items that need to be hidden away.
- Bookcases (Sturdy Ones!): An old sturdy bookcase (ensure it’s not flimsy particle board) can be repurposed for garage shelving. Use it to store paint cans, gardening supplies, car care products, or even smaller storage bins. If it has adjustable shelves, even better!
- CD/DVD Racks: Believe it or not, slim CD or DVD racks can be perfect for organizing smaller items like spray paint cans, small bottles of oil, or even containers of screws and nails. Their narrow profile allows them to fit into tight spaces.
- Shoe Organizers (Over-the-Door or Hanging): These are surprisingly versatile. Over-the-door shoe organizers with clear pockets are excellent for storing cleaning supplies, spray bottles, small gardening tools, or even small parts. Hanging shoe organizers with cubbies can hold rags, gloves, or other smaller soft items.
- Old File Cabinets: Metal file cabinets, especially those with deeper drawers, can be great for storing automotive parts, small power tools, or even car care products. Label each drawer clearly!
- Wine Racks: While unconventional, some wine racks with their individual slots can be surprisingly good for storing rolls of tape, spray paint cans, or other cylindrical items.
- Magazine Holders: Desk-style magazine holders are perfect for organizing rolls of sandpaper, small pieces of wood, or even instruction manuals for garage equipment.
- Plastic Drawer Carts: Those multi-drawer plastic carts often found in craft stores are excellent for organizing smaller hardware, craft supplies, or even automotive fuses and electrical connectors.
- Kitchen Cabinets/Uppers: If you’ve renovated your kitchen, don’t throw out the old cabinets! They can be repurposed as excellent garage storage. Mount upper cabinets on the wall for enclosed, dust-free storage, and use base cabinets for tool storage or as a foundation for a workbench.
- Pallets: Free and versatile! Pallets can be disassembled to create custom shelving, tool racks, or even wall-mounted organizers for long-handled tools. With a bit of creativity, pallets can become incredibly functional.
- PVC Pipes: Leftover PVC pipes can be cut into various lengths and mounted to a wall to create holders for tools like shovels, rakes, or even rolls of wrapping paper or holiday lights.
- Crates (Wooden or Plastic): Stackable crates are fantastic for storing sports equipment, kids’ outdoor toys, or even gardening supplies. They offer easy access and can be moved around as needed.
5. Drawer Dividers Done Right: Taming Tiny Tools
The dreaded junk drawer. We all have one, and often, the garage workbench drawers become a magnified version of it. Loose screws, tangled measuring tapes, elusive drill bits – it’s a time-wasting nightmare. The secret to transforming these chaotic caverns into organized havens lies in drawer dividers.
Bringing Order to the Small Stuff: Drawer Divider Domination
Dividers aren’t just for socks! They are essential for keeping small tools, hardware, and miscellaneous items neatly separated and easy to find.
- Custom-Cut Wood/Cardboard Dividers: For a truly custom fit, measure your drawers and cut strips of thin plywood, MDF, or even sturdy cardboard to create a grid system. You can create different sized compartments to perfectly fit wrenches, sockets, screwdrivers, or individual hardware types. This is a very cost-effective and highly customizable solution.
- Modular Plastic Bins: These are widely available in various sizes and are fantastic for creating flexible compartments within your drawers. You can mix and match them to fit different items – a small one for nuts, a medium one for bolts, a long one for drill bits. They are also easy to clean.
- Silverware Organizers (Yes, for Tools!): The same plastic or bamboo organizers designed for kitchen cutlery can be surprisingly effective for organizing smaller hand tools like screwdrivers, pliers, utility knives, and measuring tapes. They often come with pre-set compartments that work well for garage items.
- Magnetic Drawer Liners: For metal items like drill bits, screws, and small wrenches, a magnetic drawer liner can prevent them from rolling around. This keeps everything in place even when you open and close the drawer quickly.
- Foam Inserts (Kaizen Foam): For a professional and secure fit, consider Kaizen foam (or similar closed-cell foam). You can trace your tools onto the foam and cut out custom cavities, providing a perfectly snug and protective fit for each item. This is excellent for valuable or delicate tools.
- Repurposed Containers: Don’t underestimate household items! Small plastic food containers (like take-out containers or butter tubs), old ice cube trays, or even empty egg cartons can be cleaned and repurposed as free drawer dividers for small parts.
- Tool Trays with Lids: For small, specialized sets of items (like a set of drill bits or specialized wrenches), consider using compact tool trays that fit neatly into your larger drawers.
- Tiered Organizers: Some drawer organizers feature multiple tiers or sliding trays, allowing you to maximize vertical space within a deep drawer and keep frequently used items on top.
- Labeling (Inside the Drawer!): Once you’ve divided and organized, add small labels to the bottom of each compartment indicating what belongs there. This ensures everything gets put back in the right spot.
- Dedicated Drawers: Try to dedicate drawers to specific categories – one for drilling, one for measuring, one for fasteners, etc. This further streamlines your workflow and reduces search time.
- Rubber Drawer Liners: Even without dividers, a non-slip rubber drawer liner can prevent tools from sliding around and getting jumbled.
6. Basket Bonanza: Easy Access Storage Bins
Storage bins are the workhorses of garage organization, but not all bins are created equal. The “basket bonanza” approach emphasizes using the right kind of bins – easy-access options that promote visibility and simple retrieval, making your garage storage truly functional.
Bin There, Done That: Smart Strategies for Basket Storage
Forget digging through opaque, unlabeled bins. The goal here is instant visibility and accessibility.
- Clear Plastic Bins with Lids: These are your go-to for general storage. Clear plastic allows you to see the contents at a glance, eliminating guesswork. Lids protect items from dust, moisture, and pests. Use them for holiday decorations, off-season clothing, sports equipment, or bulk supplies. Stackable versions maximize vertical space.
- Open-Front Bins (Stackable): For frequently accessed items, open-front bins are fantastic. You can reach in and grab what you need without removing the bin from a shelf. These are ideal for small hand tools, gardening gloves, rags, car care products, or even kids’ outdoor toys. Many are designed to interlock or stack securely.
- Wire Baskets/Crates: These offer excellent ventilation, making them perfect for items that need airflow, such as sports balls, dirty rags, or even root vegetables (if your garage is temperate). They also provide a clear view of contents.
- Fabric Bins (Sturdy!): While less common in garages due to potential for dirt, sturdy fabric bins can be useful for lighter items like towels, car detailing cloths, or even larger gardening gloves. Choose those with rigid sides for durability.
- Heavy-Duty Totes (Wheeled): For extremely heavy or bulky items, large plastic totes with wheels are a lifesaver. You can easily roll them out from under shelves or from a storage corner, then roll them back without straining your back.
- Metal Bins/Tubs: For a more industrial look or for storing items that might be oily or dirty, metal bins are durable and easy to clean. Perfect for auto parts or gardening supplies.
- Labeling is L-O-V-E: No matter the bin type, labeling is non-negotiable. Use large, clear labels on the front and/or sides of each bin. Consider using a label maker, a large permanent marker, or even printed labels. Be specific (e.g., “Holiday Lights – Outdoor” instead of just “Holiday Stuff”).
- Categorize & Contain: Before you bin, categorize! Group like items together – all camping gear in one set of bins, all car wash supplies in another, all gardening tools in a third.
- Shelving Systems for Bins: Bins work best when housed on sturdy shelving units. This keeps them off the floor and in easily accessible rows. Consider shelving units that match the dimensions of your preferred bins.
- Sliding Bin Systems: Some advanced garage systems offer shelving with sliding tracks for bins, allowing for even easier access to items stored deeper on the shelf.
- Stacking & Nesting: Choose bins that either stack securely with lids or nest inside each other when empty, saving space.
7. Magnetic Magic: Keeping Small Parts Handy
Small metal items – screws, drill bits, small wrenches, keys, scissors – have a notorious habit of disappearing into the abyss of cluttered drawers or tabletops. Magnetic solutions are a simple yet incredibly effective way to keep these vital little pieces visible, organized, and always within arm’s reach.
Attracting Order: The Power of Magnets
Magnetic storage is all about convenience and visibility. It leverages the power of attraction to keep your small metal essentials exactly where you need them.
- Magnetic Tool Holders/Bars: These are perhaps the most common and versatile magnetic storage solution. Mount a strong magnetic bar directly to your garage wall above your workbench, near your tool chest, or inside a cabinet door. Instantly stick screwdrivers, wrenches, pliers, utility knives, and even smaller hammers to it. This keeps frequently used tools visible and prevents them from cluttering your workspace.
- Magnetic Bowls/Trays: While working on a project, a magnetic bowl or tray is a lifesaver. Place it on your workbench, and as you remove screws, nuts, and bolts, simply toss them into the magnetic bowl. They’ll stick to the bottom, preventing them from rolling off the bench and getting lost. Some come with a rubber base to prevent scratching surfaces.
- Magnetic Parts Strips for Drawers: Line the bottom of your workbench drawers with magnetic strips or sheets. This prevents small metal items like drill bits, nuts, and bolts from sliding around and mixing together when you open and close the drawer.
- Magnetic Spray Can Holders: Some systems include magnetic holders specifically designed to securely hold spray paint cans or other aerosol cans on a metal surface (like the side of a tool chest).
- Knife Strips (Repurposed): The magnetic strips designed for kitchen knives are often perfect for garage use. They’re strong and can hold a variety of small tools.
- Magnetic Storage Pods/Containers: Small containers with magnetic backs can be adhered to any metal surface. These are great for storing very small quantities of specialized screws, washers, or other tiny components.
- Magnetic Hooks: Similar to magnetic tool bars but with individual hooks, these are useful for hanging keys, small measuring tapes, or even lightweight hand tools.
- DIY Magnetic Wall Panels: For a larger solution, you can create your own magnetic wall panel by attaching strong rare-earth magnets behind a thin sheet of plywood or directly to a metal sheet.
- Beyond Tools: Key Keepers & More: Think beyond just tools. A magnetic strip near your garage entry can be a handy spot for keys, small flashlights, or even a pair of utility scissors.
- Drill Bit Organizers: Many drill bit sets now come in magnetic cases or holders, making it easy to keep them organized within a drawer or on a shelf.
- Safety First: Ensure any magnetic solution you use is strong enough to hold the weight of the items securely, preventing accidental drops.
8. DIY Shelving Sensations: Build Your Own Storage
Why buy expensive, pre-made shelving when you can build exactly what you need, often for a fraction of the cost? DIY shelving not only allows for ultimate customization but also provides the satisfaction of a job well done. It’s about maximizing every awkward nook and cranny with a storage solution tailored to your specific items.
Crafting Your Own Organization: The Joys of DIY Shelving
DIY shelving isn’t just about saving money; it’s about creating bespoke solutions that perfectly fit your garage’s unique dimensions and your individual storage needs.
- Basic Plywood & 2×4 Shelving: This is the workhorse of DIY garage shelving. With some plywood for the shelves and 2x4s for the frame, you can build incredibly sturdy, custom-sized units. These are perfect for heavy items like paint cans, large toolboxes, or stacked storage bins. You can make them as tall, wide, or deep as you need.
- Floating Shelves (Heavy-Duty): For a cleaner look, heavy-duty floating shelves (anchored directly into wall studs) can provide excellent storage for lighter items without the need for visible brackets. Ensure they are properly installed for safety.
- Adjustable Shelf Systems (Cleats): Build a basic frame, then use a series of cleats (small strips of wood) on the uprights to allow your shelves to be easily moved up or down. This offers incredible flexibility as your storage needs change over time.
- Corner Shelving: Don’t let those awkward garage corners go to waste! Build custom triangular or L-shaped shelves to maximize this often-underutilized space. They’re perfect for smaller items or creating a designated corner zone.
- Ladder Shelving: Repurpose an old wooden ladder by bracing it against a wall and adding planks between the rungs to create rustic and functional shelving.
- Over-the-Door/Window Shelving: Build narrow shelves directly above garage doors or windows. These areas are often overlooked but can provide valuable space for lighter, infrequently accessed items.
- Crate/Pallet Shelving: As mentioned in “Repurposed Racks,” wooden crates or disassembled pallets can be repurposed into unique and rustic shelving units. Stack crates or use pallet wood to build custom shelves.
- Recessed Shelving: If you have wall cavities (like between studs), consider building simple recessed shelves. This creates built-in storage that doesn’t protrude into your garage space.
- Long-Item Storage (Vertical): Build a narrow, tall shelving unit with vertical dividers to store long items like brooms, mops, rakes, or even sections of lumber. This keeps them from toppling over.
- Ceiling-Mounted DIY Shelves: Similar to commercial overhead racks, a confident DIYer can build sturdy platforms directly attached to ceiling joists for long-term storage of lighter items in bins.
- Tool Shed Style Shelving: For a more enclosed look, you can add doors to your DIY shelving units, transforming them into custom cabinets for a cleaner aesthetic and dust protection.
- Mobile Shelving Units: Add heavy-duty casters to the bottom of your DIY shelving units to create mobile storage. This is incredibly useful if you need to reconfigure your space frequently or move tools closer to your projects.
9. Corner Caddies: Maximizing Awkward Spaces
Garage corners are notorious for becoming black holes of clutter. Tools get piled, boxes get shoved, and before you know it, that corner is a messy, inaccessible wasteland. But with a little strategic thinking, these awkward spaces can be transformed into highly efficient storage zones.
Unlocking Corner Potential: Smart Solutions for Tricky Nooks
The goal is to prevent the “corner pile-up” by creating purpose-built storage that makes every inch count.
- Corner Shelving Units: The most obvious solution is a dedicated corner shelving unit. These can be L-shaped or triangular, designed to fit snugly into the corner. They’re excellent for organizing paint cans, car care products, gardening supplies, or stacked storage bins.
- Vertical Tool Caddies/Racks: For long-handled tools like rakes, shovels, brooms, and mops, a corner caddy that holds them upright is ideal. This keeps them neat, prevents them from toppling over, and takes up minimal floor space. You can buy these or DIY with PVC pipes.
- Tiered Corner Organizers: Similar to corner shelving but often with smaller, rotating tiers, these are great for organizing smaller items like spray bottles, cleaning supplies, or detail brushes.
- Mobile Corner Carts: If you need flexibility, a small, triangular cart on wheels can fit into a corner and be easily pulled out when needed. Perfect for a mobile detailing station or a collection of frequently used tools.
- DIY Corner Cabinets: For a more integrated look, build a custom corner cabinet. This can provide enclosed, dust-free storage and a clean aesthetic.
- Sports Equipment Corners: Utilize a corner with large mesh bags or designated bins for sports balls, helmets, or other bulky equipment. This keeps them contained and out of the main thoroughfare.
- Recycling/Trash Hub: A corner is often the perfect spot for your recycling bins and trash can. Consider a multi-bin system for easy sorting.
- Garden Hose Reel/Extension Cord Holder: Install a wall-mounted hose reel or a heavy-duty extension cord holder directly in a corner. This keeps these items tidy and prevents tangles.
- Bike Rack (Corner Specific): Some bike racks are designed to store bikes at an angle in a corner, maximizing space efficiency for multiple bikes.
- Workbench Extension: If your main workbench ends near a corner, extend it with a small L-shaped counter or shelving unit to create a larger, more functional workspace.
- Utility Sink/Wash Station: If you’re adding a utility sink to your garage, a corner is often the most practical and space-efficient location.
- Pet Feeding Station: A corner can be a discreet and tidy spot for pet food bowls and storage containers.
10. Label It Up: The Key to Staying Organized
You’ve done the hard work: decluttered, installed shelving, hung tools, and filled bins. But without proper labeling, all that effort can quickly unravel. Labeling isn’t just an aesthetic choice; it’s the cornerstone of sustainable organization, ensuring everything has a clear home and can be found – and returned – with ease.
The Power of the Pen: Making Your Organization Stick
Think of labels as the “operating manual” for your organized garage. They provide clarity, reduce frustration, and save time.
- Be Specific, Not Vague: Instead of “Tools,” use “Hand Tools – Wrenches,” “Power Tools – Drills.” Instead of “Holiday Stuff,” use “Holiday Lights – Outdoor,” “Christmas Decor – Tree Ornaments.” The more specific, the better.
- Use a Label Maker: A dedicated label maker provides a clean, uniform, and professional look. This makes your labels easy to read and gives your garage a polished feel.
- Large, Clear Labels: Especially for bins stored on high shelves, use large font sizes and clear, contrasting colors so labels are legible from a distance.
- Label All Bins & Boxes: Every single bin, box, or container should have a clear label on at least one side, ideally on the front so you can see it when stacked.
- Label Shelves: If specific items or categories belong on certain shelves, label the shelf itself. For example, “Automotive Fluids,” “Camping Gear,” or “Paint Supplies.”
- Label Drawers: Even with internal dividers, a label on the front of each drawer instantly tells you its contents, preventing you from pulling out multiple drawers to find what you need.
- Shadow Board Labels: As mentioned with pegboard, consider not just outlining tools but also adding a small label with the tool’s name. This is particularly helpful if multiple people use the tools.
- Visual Labels (Pictures): For children’s toy bins or for those who prefer visual cues, consider printing out small pictures of the items (e.g., a picture of a soccer ball for the “Sports Balls” bin) and laminating them.
- Color-Coding with Labels: Combine labeling with color-coding. Use different colored bins or label tape for different categories (e.g., red for car care, green for gardening).
- Temporary vs. Permanent: For items whose contents might change frequently, use temporary labels (like masking tape and a marker) that can be easily updated. For permanent categories, use durable, permanent labels.
- Contents List (for opaque bins): For larger, opaque bins with a variety of items, consider taping a detailed contents list to the inside of the lid or on the front of the bin. This is especially useful for holiday decorations or camping gear.
- Maintenance & Review: Labels aren’t a one-and-done deal. As your garage contents or organization system evolves, make sure to update your labels accordingly. Regularly review your labels to ensure they are accurate and still serving their purpose.
Your Organized Garage Awaits!
Transforming your garage from a cluttered mess into a highly organized, functional, and even inspiring space is entirely within reach with these 10 genius storage hacks. From utilizing every inch of vertical space on your walls and ceilings to taming tiny tools with clever drawer dividers and making everything easily discoverable with smart labeling, you now have a comprehensive toolkit for organization.
Remember, the goal isn’t just to make things look neat, but to create a system that truly works for you and your family. A well-organized garage saves you time, reduces stress, and protects your belongings. So, take a deep breath, tackle one area at a time, and get ready to enjoy the incredible satisfaction of a perfectly optimized garage.
Which of these hacks are you most excited to try first? Share your garage organization goals in the comments below!