Your garage doesn’t have to be a forgotten space that’s sweltering in the summer and freezing in the winter. Insulating your garage offers a practical and effective solution to a common household problem, transforming the space from a thermal dead zone into a comfortable, usable extension of your home. It’s an upgrade that pays dividends not just in comfort, but in energy savings and increased home value.
The Benefits: Beyond a Usable Space
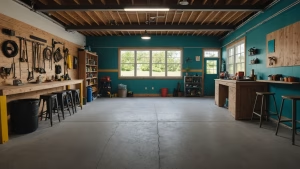
Insulating your garage is a strategic move that delivers a variety of benefits. The most obvious is the temperature regulation. A properly insulated garage will maintain a more stable internal temperature, making it a viable space for a workshop, home gym, hobby room, or even just a more pleasant environment for getting in and out of your car.
However, the advantages extend well beyond simple comfort.
- Energy Efficiency: For attached garages, the uninsulated walls, ceiling, and door act as a thermal bridge, allowing heat to escape in the winter and enter in the summer. This forces your home’s HVAC system to work harder, leading to higher utility bills. Insulating the garage creates a strong thermal barrier that eases the burden on your heating and cooling systems, directly translating to lower energy costs for your entire home.
- Protection for Stored Items: Garages are often used for storing tools, electronics, sporting equipment, and even food. Extreme temperature swings can damage these items, leading to cracked plastics, corroded metals, and shortened lifespans for electronics. Insulation provides a buffer, protecting your possessions from harsh conditions.
- Noise Reduction: Insulation acts as a sound barrier, dampening noise from the outside and reducing noise from within, like car engines or power tools. This is particularly beneficial if your garage is adjacent to a bedroom or living area.
- Increased Home Value: A well-insulated garage is an attractive feature for prospective buyers, who see it as a valuable, ready-to-use space. This can increase your home’s resale value and make it more marketable.
Types of Insulation: Choosing the Right Material
The BEEST Closed Cell Spray Foam Insulation Kit is a comprehensive solution tailored for enhancing the energy efficiency of your home. This kit includes 12 spray foam cans, a heavy-duty application gun, powerful cleaner, and safety gear, making it ideal for both wall and attic insulation projects. Users appreciate its strong adhesion to a variety of surfaces such as wood, metal, and brick, while its moisture resistance and fast curing time are equally praised. Reviews highlight that, when applied correctly, the foam effectively reduces noise and maintains stable temperatures, offering considerable cost savings compared to professional insulation services. However, some users caution about its messiness and recommend extra preparation to ensure optimal results. Overall, it garners a mix of high praise for its effectiveness and some critiques regarding application challenges.

When it comes to insulating your garage, you have several material options, each with its own R-value and characteristics. The R-value measures a material’s resistance to heat flow; a higher R-value means better insulating performance.
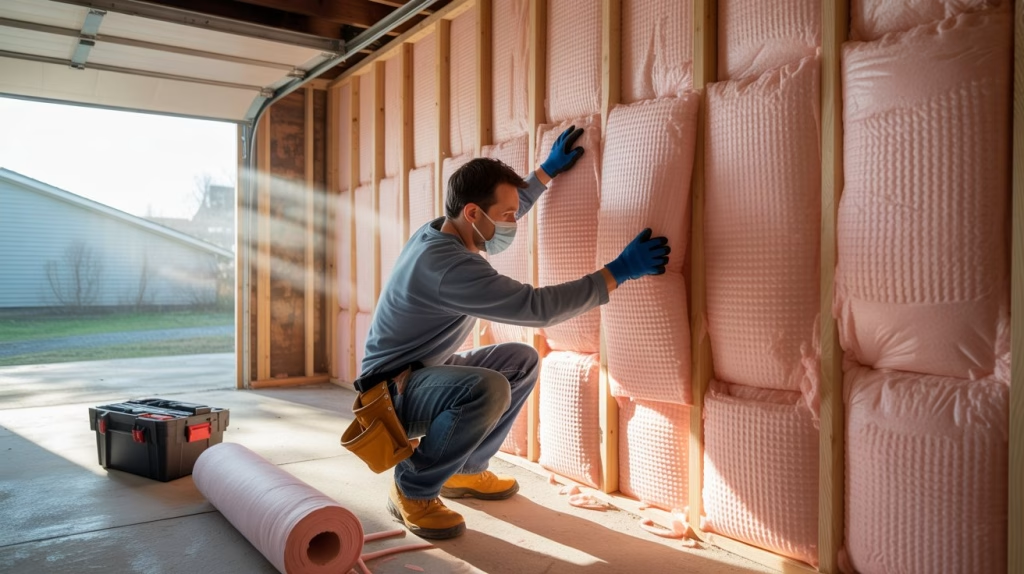
- Fiberglass Batts: This is the most popular and budget-friendly choice for insulating walls and ceilings with exposed studs. It comes in pre-cut sections (batts) that are easy for a DIY enthusiast to install. However, fiberglass can be an irritant, requiring proper safety gear like gloves, glasses, and a mask during installation.
- Rigid Foam Boards: Made from materials like polyisocyanurate (polyiso) or expanded polystyrene (EPS), these panels offer a high R-value per inch, making them an excellent choice for areas where space is limited, like behind drywall. They are moisture-resistant and durable.
- Spray Foam: This is a premium option that requires professional application. It expands to fill every crack and crevice, creating an airtight, seamless thermal and moisture barrier with a very high R-value. While more expensive, it provides superior performance.
- Garage Door Insulation Kits: These kits typically contain pre-cut rigid foam panels or rolls of fiberglass insulation designed to fit directly into the panels of your garage door. They are a simple and effective way to address the single largest uninsulated surface in most garages.
The DIY Guide: A Step-by-Step Approach
Insulating a garage is a project that can be tackled by a dedicated homeowner. Here is a step-by-step guide to get you started.
Step 1: Preparation is Key 🛠️
- Empty the Garage: Before you begin, remove everything from the walls and floor. You need an empty, clear workspace.
- Inspect and Seal: Look for any cracks or gaps in the walls, ceiling, or around windows and doors. Use an expanding foam sealant or caulk to seal these gaps. This is a critical step, as air leaks can undermine all your insulation efforts.
- Take Safety Precautions: Wear appropriate safety gear. For fiberglass insulation, this includes a long-sleeved shirt, pants, gloves, safety glasses, and a dust mask to protect your skin and lungs from the fibers.
Step 2: Insulating the Garage Walls
- Measure and Cut: Measure the space between the wall studs. Using a utility knife, cut the fiberglass batts or foam boards to fit snugly, leaving no gaps. It’s often recommended to cut the insulation slightly larger (about a half-inch wider) to ensure a tight friction fit.
- Install the Insulation:
- For fiberglass batts with a paper face, the paper acts as a vapor barrier. Staple the paper flanges to the sides of the studs, not the face. This leaves the face of the studs exposed for future drywall installation.
- For rigid foam boards, you can secure them with an adhesive or mechanical fasteners.
- Vapor Barrier (If needed): Depending on your climate, you may need to add a separate vapor barrier over the insulation before installing drywall. In colder, drier climates, the barrier goes on the inside (warm side) of the wall. In warmer, more humid climates, it goes on the outside (cold side).
Step 3: Insulating the Garage Door
- Choose Your Kit: Buy a garage door insulation kit that matches your door type (e.g., steel, wood).
- Clean and Measure: Clean the door panels thoroughly to ensure any adhesive will stick. Measure each door panel, as they may vary slightly in size.
- Cut and Install: Follow the kit’s instructions for cutting the panels to size. The panels are typically held in place with double-sided tape or retainer clips. Press each piece firmly into place, ensuring a tight fit.
he Owens Corning Garage Door Insulation Kit is an affordable and effective solution for enhancing the thermal efficiency of your garage space. Designed to fit garage doors up to 9 feet wide, this kit includes eight durable fiberglass insulation panels with a washable white vinyl facing, ensuring easy maintenance. Users report a considerable reduction in noise and temperature, making it particularly effective for blocking heat transmission. Installation is straightforward and often takes less than 90 minutes, although some users noted the utility of additional adhesive tape for securing the panels more firmly. With a significant rating on Amazon (4.4 out of 5), many customers find this kit helps maintain a comfortable garage climate, despite a few concerns about long-term panel sagging.

The Financial Return: Calculating Your ROI

Calculating the Return on Investment (ROI) for garage insulation is not an exact science because it depends on multiple variables, but you can create a solid estimate. The basic formula is:
ROI = (Net Savings + Increase in Home Value) / Initial Cost x 100
Here’s how to break down the ROI calculation for your garage insulation project:
- Initial Cost: This includes the cost of insulation materials, tools, and any professional labor if you choose not to do it yourself. A typical DIY project for a two-car garage might range from $500 to $1,500 for materials, while a professional job could be $1,000 to $5,000 or more.
- Net Savings: This is the most important part of the equation.
- Energy Savings: The primary saving comes from reduced energy bills. If your garage is attached, you can estimate that insulation will reduce the heat transfer between the garage and your home. For example, if you spend an average of $2,000 annually on heating and cooling, and a well-insulated garage reduces that by 5-10%, you could save $100 to $200 per year.
- Protection of Assets: While hard to quantify, the value of protecting stored items (like tools or a secondary freezer) from temperature damage is a real financial benefit.
- Increased Home Value: While not guaranteed, an insulated garage is a major selling point. Some sources suggest energy-efficient upgrades can increase a home’s value by 1% to 3%. For a $300,000 home, that could be a $3,000 to $9,000 increase in value.
Let’s do a simple calculation:
- Initial Cost (DIY): $1,000
- Annual Energy Savings: $150
- Increase in Home Value: $5,000
Over 10 years, your total savings would be $1,500 ($150/year x 10 years). Your ROI would be:
ROI = ($1,500 + $5,000) / $1,000 = 6.5 x 100 = 650%
This shows a significant return. The ROI is even more impressive when you consider that the energy savings continue for the life of the insulation and the improved comfort is a benefit you enjoy from day one.
In conclusion, insulating your garage is a high-impact, low-risk project that pays off in multiple ways. It makes a neglected space usable year-round, lowers your energy bills, and adds tangible value to your home. It’s a simple investment in both your property and your quality of life.